Using Odysseyn1x
For support in English, ask for help on the r/Jailbreak Discord Server.
DANGER
If you are trying to use a Virtual Machine software of some sort from Windows (e.g. Virtualbox, VMWare, Windows Subsystem for Linux, etc) you will not succeed with following this guide, and will need to obtain a bootable medium and follow the below steps using that bootable medium.
WARNING
If you are using iOS 12.0 or 12.0.1, follow Installing Amethyst instead.
WARNING
If you are using a computer with an AMD Ryzen CPU, you will likely run into issues. If you do run into issues, you should use a Mac or a computer with an Intel CPU to follow this guide.
WARNING
A7 devices will likely fail to successfully jailbreak with Odysseyn1x, as a result, you'll need to use an older Odysseyn1x version and quickly unplug and replug your device once you see Right Before Trigger. It is highly recommended to follow Installing Chimera instead.
Odysseyra1n is a semi-tethered jailbreak, meaning it requires a PC to re-apply the exploit after a reboot. Click the link to learn more.
Odysseyn1x is a live bootable Linux environment that allows you to quickly run checkra1n on a compatible device. checkra1n is capable of jailbreaking millions of iOS devices with A7 to A11 SoC's on firmwares 12.0 to 14.8.1.
After installing checkra1n, we'll be using a script to install Odysseyra1n. This replaces important parts of the jailbreak with modern and fast alternatives.
On iOS 14, A11 devices do not allow you to use SEP functionality in a jailbroken state. SEP functionality are things such as a passcode, Face ID/Touch ID, and Apple Pay.
Requirements
- A 256MB or greater USB Drive
- If you don't have a USB Drive, but do have another form of supported removable bootable hardware (e.g. A CD or DVD), you can use that instead of a USB Drive
- The latest version of Odysseyn1x
- If you are on an A7 device, you should instead get the v2.12-checkra1n-0.10.1 release of Odysseyn1x
- For 64-bit computers, download the "AMD64" version
- It doesn't matter if you have an AMD processor or not, "AMD64" is just the name of the architecture
- For 32-bit computers, download the "i686" version
- Ventoy
Installing Ventoy
- Download and extract the contents of the
Ventoy.zipfile - Insert your USB drive if you have not already done so, and open the
Ventoy2Disk.exefile - Select the USB drive you would like to boot Odysseyn1x from
- This USB drive will be completely erased
- Ensure you back up all important data beforehand
- Click
Installand confirm that you are ok erasing the USB drive- Do not remove your USB Drive until the process has completed
- Once it has installed, copy the Odysseyn1x iso file that you downloaded onto the USB drive
Booting Odysseyn1x
- Reboot, and then go into your BIOS settings and disable Secure Boot, then enter the boot picker and select your USB Drive to boot from
- This is different for every computer
- Search your PC or motherboard brand to find out how to get to your BIOS settings if you are unsure
- Press enter once you see the Ventoy screen to boot into Odysseyn1x
Running checkra1n
WARNING
If you are using a USB-C to Lightning cable to do this process, you may run into issues entering into DFU mode
If you do have issues, get a USB-A to Lightning cable and, if necessary, also get a USB-C to USB-A adapter.
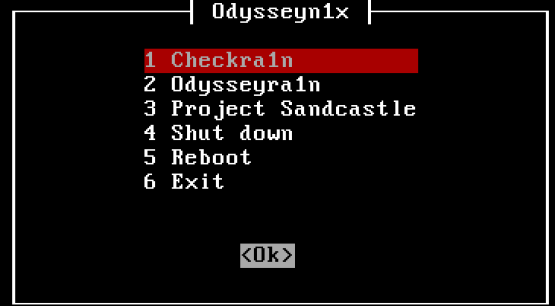
- Once you have loaded odysseyn1x, select
checkra1n- If you're on an A8X or A9X device, select the
checkra1n (A8X/A9X)option instead. - If you're on an A11 device, you will need to head into
Options, then enable theSkip A11 BPR Check - If you're on iOS 14.6 or later, you will need to head into
Options, then enable theAllow Untested Versions
- If you're on an A8X or A9X device, select the
- Click
Startand follow all onscreen prompts - You will now be presented with instructions in how to reboot your device into DFU mode, click
Startto begin- Follow the instructions until your device reboots to a black screen
- Once your device boots, you can quit checkra1n, but do not shut down your computer
TIP
While you could, at this stage, install Cydia instead of continuing with the Odysseyra1n steps, we don't recommend it because of the fact that:
- People generally tend to have more stability when using Odysseyra1n instead of installing Cydia
- Certain ease-of-use functionality (such as shshd, which automatically saves blobs for you when jailbroken) is not available
- Some tweaks may require or be better tested with software that Odysseyra1n utilizes, rather than the software that is used when you choose to install Cydia
The Odysseyra1n script
TIP
If you would prefer to do so, instead of running the script on your computer, you can run the Odysseyra1n script using the shortcut by opening this page on your device and then clicking the shortcut hyperlink.
The following steps only need to be performed once and are optional but highly recommended for a smoother experience and modern bootstrap.
- Unlock your device
- Ensure that your computer is trusted by your device
- Select
Odysseyra1nin Odysseyn1x - Sileo should install to your device
- Do not close Odysseyn1x as you will need to re-jailbreak in a few minutes
DANGER
After installing Odysseyra1n, do not install Cydia from the Loader app.
You should now be jailbroken with Sileo installed on your home screen. You can use Sileo to install tweaks, themes, packages and more.
Before you can start installing anything else, you first need to install a few necessary programs.
Installing packages
- Open the newly installed Sileo application
- Go to the "Packages" tab
- Tap "Upgrade All" if there are any updates
- Do not install yet
- Go to the "Search" tab
- Search for the "libhooker" package
- Tap the "Get" button
- Tap on the "Queued" bar at the bottom of your screen
- Tap "Confirm"
- Once finished, tap 'Restart SpringBoard'