Using checkm8-a5
For support in English, ask for help on the r/Jailbreak Discord Server.
Requirements
- An Arduino Uno
- A MAX3421E USB host shield, and USB-A to USB-B cable
- A soldering iron
- 0.5mm solder
- Solder flux (Optional)
DANGER
Following this guide is a difficult task and requires moderate soldering and computer terminal skills. Proceed with caution.
Preparing the host shield
Your host shield can arrive in two states - with headers, and without. If it is with headers, it will have pins and pin sockets already soldered to it, allowing you to connect it to an Arduino by simply placing it on top. If it has headers, your job is much easier.
You will need to solder three pads on your USB host shield. The pads to solder are circled in this image:
- Plug in your soldering iron so it starts to heat up
- Once it has heated up, place your USB host shield near a good source of light
- Get your solder and touch it to the soldering iron, so that a small ball of solder forms on the tip
- Touch this ball of solder to the pad that you have chosen - make sure it touches both sides of the pad
- Repeat steps 3-4 until all three pads have been bridged
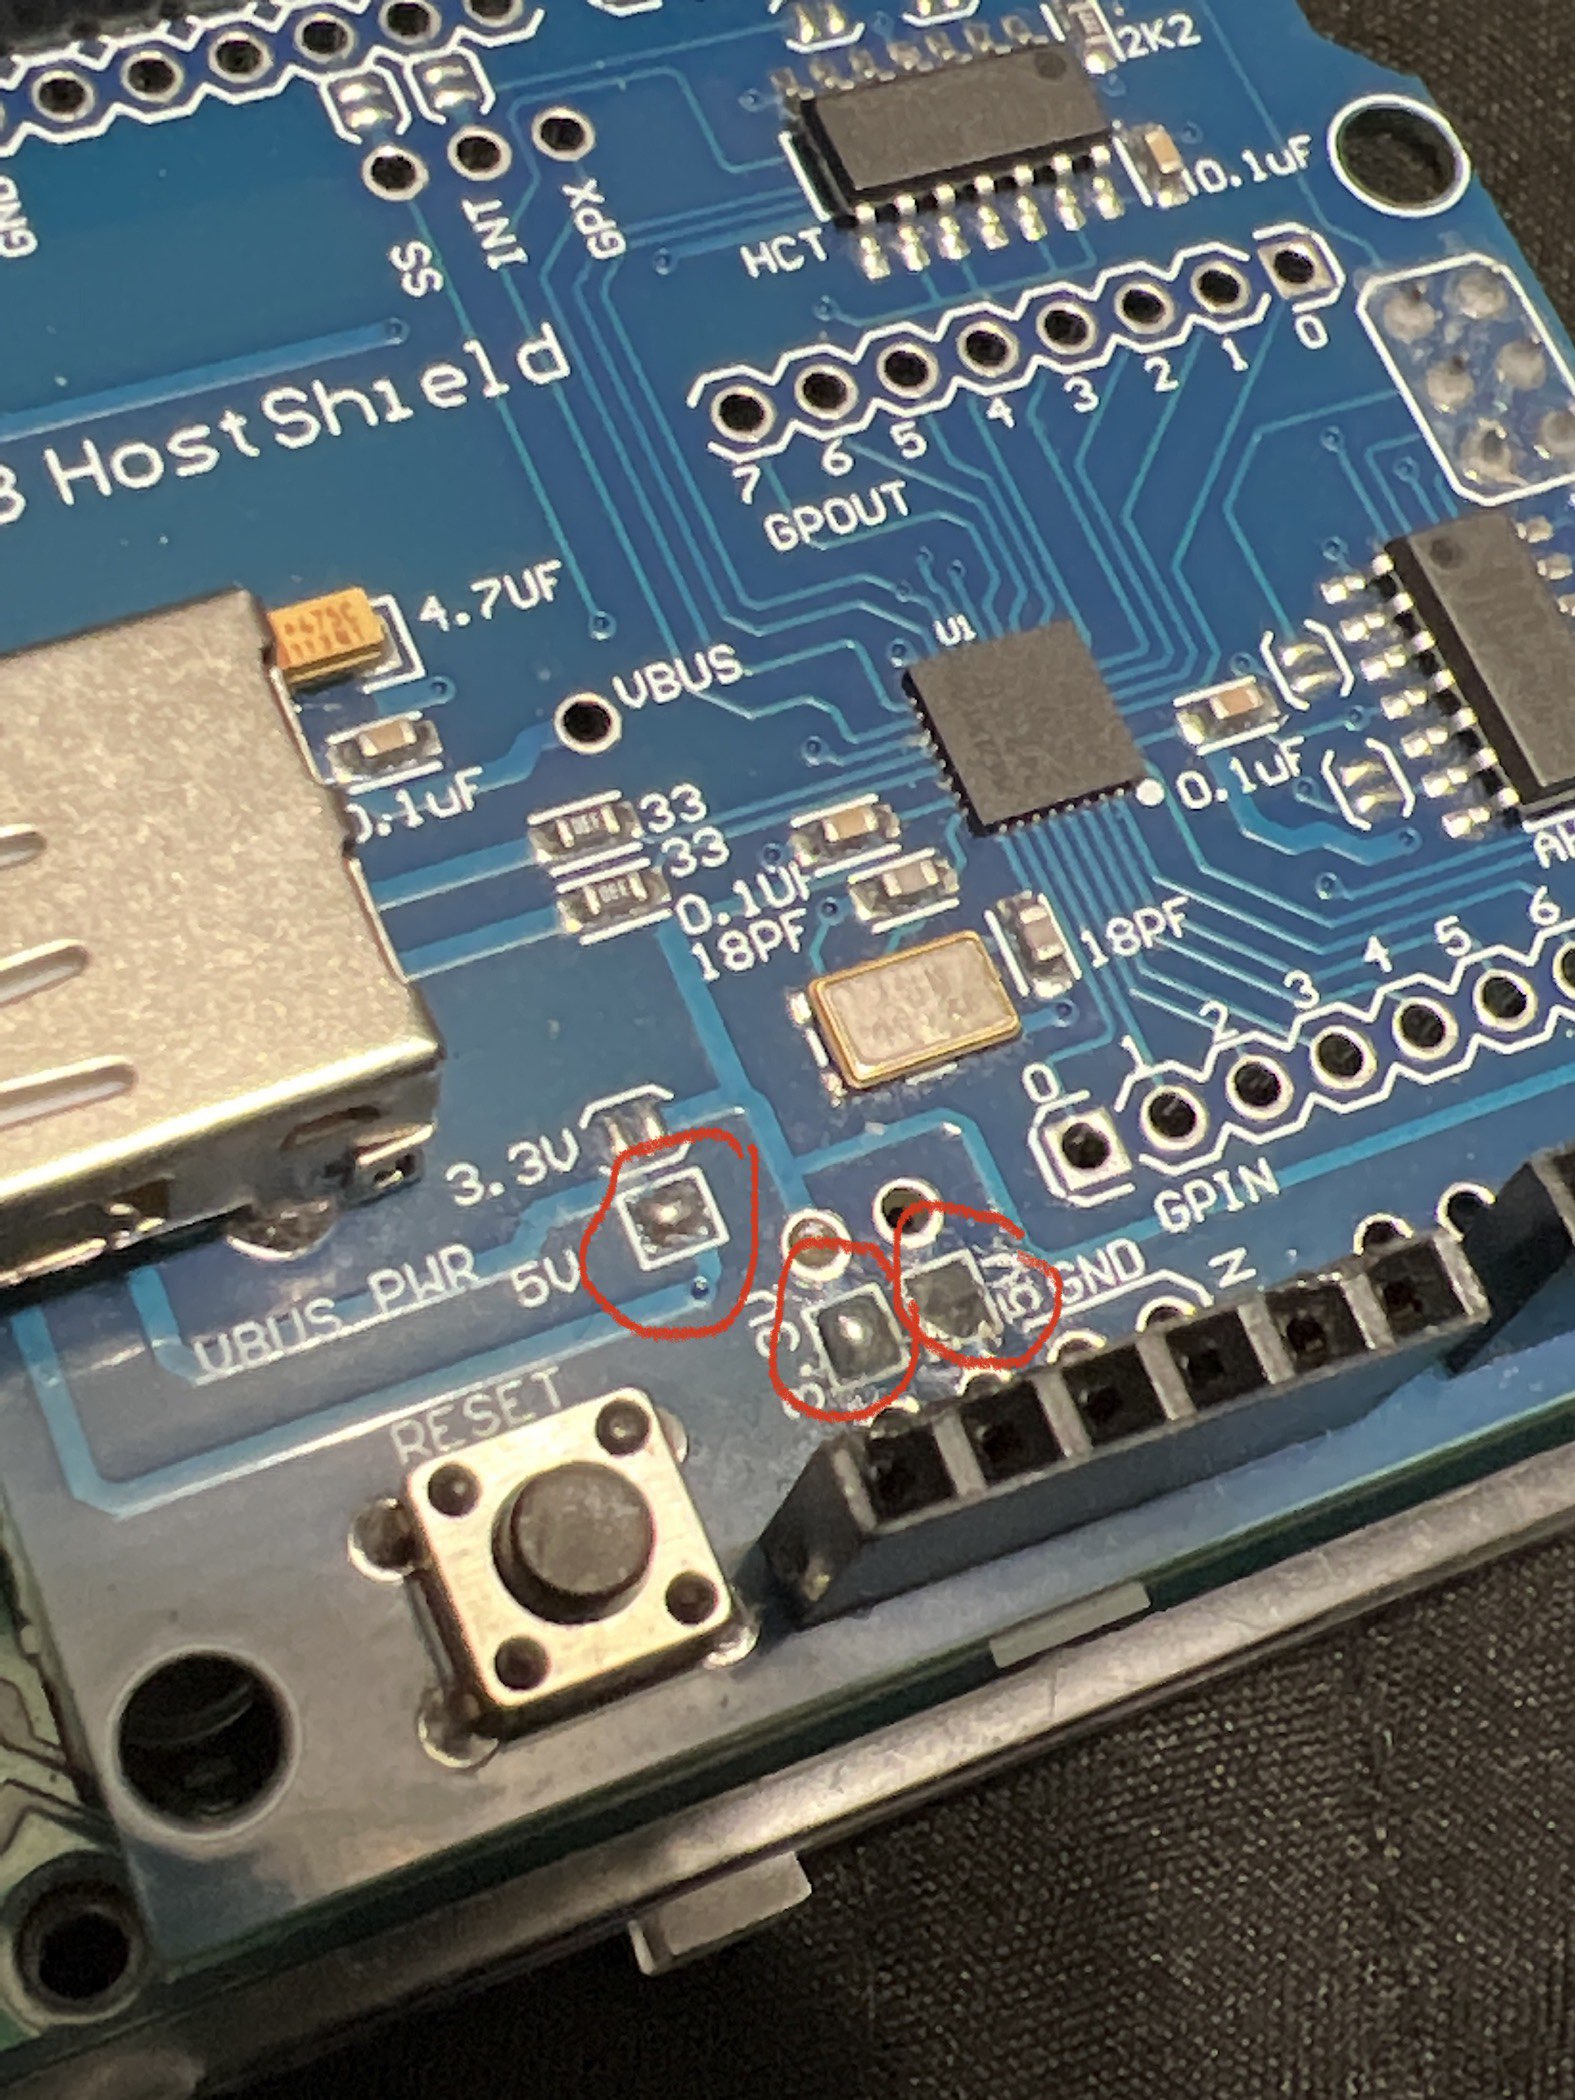
You will need to solder five sets of headers and bridge three pads on your USB host shield. The pads to solder are circled in this image:
- Plug in your soldering iron so it starts to heat up
- Once it has heated up, place your USB host shield near a good source of light
- Insert the first header into the holes on the board
- For the single-row headers, ensure the sockets face towards the side with the ICs and USB port
- For the dual-row header, ensure the sockets face on the opposite side of the board.
- Get a medium-sided length of solder and form it into a straight wire shape
- Touch it to a pin on the header - it's easiest to work from one edge and work your way to the other
- Then, touch the soldering iron to the solder slightly away from the board, so that a short length of it is separated
- This should form itself around the pin, securing the pin to the board
- If it doesn't, remelt the solder and move it to the proper place
- Repeat step 4 until all 34 pins are properly affixed
- Ensure none of the pins are bridged (solder connecting two or more pins together)
- Once the headers are soldered, get your solder and touch it to the soldering iron, so that a small ball of solder forms on the tip
- Touch this ball of solder to the pad that you have chosen - make sure it touches both sides of the pad
- Repeat steps 6-7 until all three pads have been bridged.
Installing Git
To use checkm8-a5, you'll need Git. Depending on what version of macOS you're on, the steps are different.
- Download the Git installer from this link
- Open and run the installer
- Once it is installed, open Terminal and run
git --versionto verify it has installed properly
- Install Brew, if you don't have it installed already, by opening a terminal window and running the command:
/bin/bash -c "$(curl -fsSL https://raw.githubusercontent.com/Homebrew/install/HEAD/install.sh)" - Enter your user password when prompted
- Installing brew can take up to half an hour to complete
- Once Brew is installed, run the command
brew install gitin terminal - Once it is complete, run the command
git --versionto verify it has installed properly
Patching the USB Host Shield 2.0 Library
- Open a new Terminal window and run the command
git clone https://github.com/felis/USB_Host_Shield_2.0.git - Run the command
git clone https://github.com/synackuk/checkm8-a5.git - Run the command
cd USB_Host_Shield_2.0 && git apply ~/checkm8-a5/usb_host_library.patch/
Preparing the Script
- Download and install the Arduino IDE
- While it is installing, connect your MAX3421E USB host shield to the Arduino
- The pins and sockets on the bottom of the host shield will line up with the pins and sockets on the Arduino
- Connect your Arduino to your computer
- Once the Arduino IDE is installed, open Finder, press Command+Shift+G, and type in
~/checkm8-a5 - Open the file named
checkm8-a5.ino - In the same Terminal window as before, run
cp -r ~/USB_Host_Shield_2.0 ~/Documents/Arduino/libraries/USB_Host_Shield_Library_2.0
Running the Script
TIP
It may take a few tries to get your device into DFU. Be patient and ensure you follow the steps exactly.
- Connect your iPhone or iPad to your computer
- Enter DFU using this guide
- Disconnect your device from your computer and connect it to your USB host shield.
- Under the Tools menu, select Port and ensure your Arduino is selected
- In the checkm8_a5 script, find the line that reads
#define A5_8942and change it to#define A5_8940 - Again under the Tools menu, open Serial Monitor. Set the baud rate is set to 115200, then upload the sketch to the Arduino
- Serial Monitor will begin displaying a log of what the script is doing
- Once it displays
Done!, disconnect your device from the Arduino and proceed to the next steps
- Connect your iPhone, iPad, or iPod to your computer
- Enter DFU using this guide
- Disconnect your device from your computer and connect it to your USB host shield
- Under the Tools menu, select Port and ensure your Arduino is selected
- Again under the Tools menu, open Serial Monitor. Set the baud rate is set to 115200, then upload the sketch to the Arduino
- Serial Monitor will begin displaying a log of what the script is doing
- Once it displays
Done!, disconnect your device from the Arduino and proceed to the next steps
WARNING
On the iPad 3, success rate is much lower compared to other devices. It is not uncommon for it to take upwards of 10 tries to successfully exploit.
- Connect your iPhone, iPad, or iPod to your computer
- Enter DFU using this guide
- Disconnect your device from your computer and connect it to your USB host shield
- Under the Tools menu, select Port and ensure your Arduino is selected
- In the checkm8_a5 script, find the line that reads
#define A5_8942and change it to#define A5_8945. - Again under the Tools menu, open Serial Monitor
- Set the baud rate is set to 115200, then upload the sketch to the Arduino
- Serial Monitor will begin displaying a log of what the script is doing
- Once it displays
Done!, disconnect your device from the Arduino and proceed to the next steps
- Connect your Apple TV to a computer with a MicroUSB cable
- You will most likely need to disconnect the HDMI cable
- Enter DFU mode by completing the following steps:
- Hold Menu and Down until the LED on the Apple TV flashes rapidly.
- Let go, then hold Menu and Play/Pause until the LED on the Apple TV flashes rapidly
TIP
If iTunes or Finder says n/a when listing the serial number when reporting it detected an Apple TV in recovery or DFU mode, it has successfully entered DFU.
If it displays the serial number, try the steps again - it entered Recovery Mode instead.
- Disconnect your Apple TV from your computer and connect it to your USB host shield
- Under the Tools menu, select Port and ensure your Arduino is selected
- Also under the Tools menu, open Serial Monitor
- Set the baud rate is set to 115200, then upload the sketch to the Arduino
- Serial Monitor will begin displaying a log of what the script is doing
- Once it displays
Done!, disconnect your Apple TV from the Arduino
WARNING
At this step, there are many errors you may see. A list of the most common, with fixes, are as follows:
usb init failed: This means you did not solder the USB host shield correctly. Double-check everything is soldered properly and there are no bridges between pins.Non Apple DFU found (vendorID: 0, productId: 0): This means the exploit failed. Force reboot the device, reenter DFU, and try the script again.heap_feng_shui_req: setup status = 0, data status = 4on loop: This is usually not an error. If it goes on for more than two minutes, force reboot the device and try the process again - otherwise, it should proceed to sending the line2. set global state.heap_feng_shui_req: setup status = D, data status = 5on loop is an error, but easily fixable - simply reupload the script to the Arduino and it should work. If it still doesn't, reenter DFU and try the process again.
If checkm8-a5 printed out Done!, your A5 device is now successfully pwned. You may return to whatever guide you were following previously, if any.